Monday, February 06, 2012

Gluten Free Chocolate Glitter Cookies

I never really thought about gluten and what it means to go gluten-free until recently.  It was suggested to me to go GF to help increase my overall wellbeing and I have learned many things in the short time I have been heeding this advice.  The most interesting thing is that going gluten-free is not as difficult as I thought.  There are tons of products out there that support this diet and I've had a lot of fun researching it with regards to baking.

These glitter cookies were my first attempt at GF baking.  These little nuggets are made with ground almonds and bake up to be tasty, chewy, brownie-like cookies.  Everyone loved them and they were gone almost instantly.  Give them a try - you won't miss the wheat. :)


Gluten Free Chocolate Glitter Cookies

6 oz (170 g) bittersweet chocolate, chopped
3 tbsp (45 mL) butter
2 eggs
1/4 cup (60 mL) granulated sugar
1/4 cup (60 mL) liquid honey
2 cups (500 mL) ground almonds
1 pinch salt
1/4 cup (60 mL) coarse sugar

Line 2 rimless baking sheets with parchment paper or grease; set aside.

In heatproof bowl over saucepan of hot (not boiling) water, melt chocolate with butter, stirring occasionally. Let cool to room temperature.

In bowl, beat eggs, granulated sugar and honey until foamy; fold in chocolate. In separate bowl, whisk almonds with salt ; fold into chocolate mixture. Cover; refrigerate until firm, 1 hour. (Make-ahead: Refrigerate for up to 24 hours.)

Roll dough by rounded 1 tbsp (15 mL) into balls; roll each in coarse sugar. Place, 2 inches (5 cm) apart, on prepared pans. Freeze until firm, 15 minutes. Bake in top and bottom thirds of 325°F (160°C) oven, rotating and switching pans halfway through, until bottoms are darkened, 16 minutes. Let cool for 5 minutes. Transfer to racks; let cool.
Additional information : Tip: Unless otherwise noted, cookies can be stored between waxed paper in airtight container for up to 5 days or frozen for up to 1 month.

Recipe Source : Canadian Living Holiday Celebrations: 2007

Monday, January 23, 2012

Gunn's Cheese Onion Buns

I've been wanting to make these for a long while.  Every time I read the recipe I could imagine how the the cheesey-oniony goodness would just melt in my mouth. I was not disappointed.

If you're comfortable with yeast and shaping dough  then making these buns will be a rewarding experience. Just give yourself time to complete the whole process and be prepared to amaze yourself and anyone you care to share with.  Next time I think I'll add more cheese.

The recipe comes from Gunn's in Winnipeg,  They make tons of yummy goodies and now you can too.

Gunn's Cheese Onion Buns

1/3 cup granulated sugar
1 1/3 cups warm milk
2 tsp dry active yeast
2 eggs
1/4 cup vegetable oil
1 1/2 tsp salt
4 1/2 cups all-purpose flour (approx)
4 tsp butter, melted
2 cups old Cheddar cheese, shredded
2 tbsp poppy seeds
1 small onion, thinly sliced
1/4 cup mayonnaise

In a small bowl, dissolve 4 tsp of the sugar in warm milk.  Sprinkle in yeast; let stand until frothy, about 10 minutes.

Meanwhile, in a large bowl and using an electric mixer, beat eggs.  Remove 2 tbsp of the beaten egg; reserve in small airtight container in refrigerator.  Add remaining sugar to beaten eggs in bowl; beat until thick and pale yellow, about 2 minutes.  Stir in yeast mixture, oil and salt.  With wooden spoon, stir in enough flour to make a slightly sticky dough.

Turn out onto lightly floured surface; knead, adding as much of the remaining flour as necessary to prevent sticking, until smooth and elastic, 10 to 12 minutes.  Place in greased bowl, turning to grease all over.  Cover with plastic wrap; let rise in warm place until doubled in bulk, about 2 hours.

Line 2 rimmed baking sheets with parchment paper; set aside.

Punch down dough, turn out onto lightly floured surface.  Divide in half.  Roll each half into 12 x 8-inch (30 x 20 cm) rectangle.  Brush each with half of the melted butter, leaving a 1/2 -inch (1 cm) border uncovered; sprinkle each with half each of the cheese and poppy seeds.  Brush edges lightly with reserved beaten egg.

Starting at long side, roll up; pinch seam to seal.  Cut into 2-inch (5 cm) thick slices; place, about 2 inches (5cm) apart, on prepared pans.  Press to flatten to 1 inch (2.5 cm) thickness.  Cover with clean tea towel and let rise in warm place until doubled in bulk, 1 1/2 to 2 hours.

Brush lightly with reserved beaten eggs; sprinkle with onion.  Top each with 1 tsp mayonnaise.  Bake in top and bottom thirds of 375 F (190 C) oven, switching and rotating pans halfway through, until golden and buns sound hollow when tapped on bottoms, 25 to 30 minutes.  Transfer to rack, let cool.  Makes 12 large buns.

Recipe Source: The Complete Canadian Living Baking Book,  2008


Tuesday, January 10, 2012

Chocolate Chocolate Muffins

Chocolate and more chocolate is pretty much what you'll get if you make these muffins. They remind me of the chocolate fudge muffin from Mmmuffins - dense and dark. I made them a little healthier by replacing some of the all-purpose flour with whole wheat. No one knew. Don't overbake them or they'll be dry and a dry chocolate muffin is no fun at all.

Chocolate Chocolate Muffins
2 cups all-purpose flour
1 cup granulated sugar
1 tsp baking soda
1/2 cup butter
3 squares unsweetened chocolate
1 cup buttermilk
1 egg
2 tsp vanilla
1 cup semisweet chocolate chips

Preheat oven to 400F. Grease a 12-cup muffin pan or line with wrappers.

In a medium bowl, stir together the flour, sugar and baking soda. Set it aside.

In a medium saucepan over low heat, melt together the butter and unsweetened chocolate. Stir until smooth, then remove from heat and let cool for just a minute. Add the buttermilk, egg and vanilla, whisking the mixture until everything is well combined. Stir in the flour mixture, mixing just until all the ingredients are moistened, then add the chocolate chips. Mix until the chips are evenly distributed.

Spoon batter into well-greased (or paper-lined) muffin pan, filling the cups to the top. Bake for 15 to 20 minutes, or until a toothpick inserted into the middle of a muffin comes out clean. Let cool for a couple of minutes before removing from the pan, then transfer to a rack to cool more or less completely. Makes 10 chocolate chocolate muffins.

Recipe Source: The Clueless Baker, 2001
Posted by Picasa

Sunday, January 01, 2012

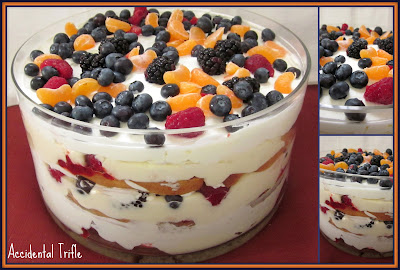
Accidental Trifle

Happy New Year!  To start things off with a bang here is the trifle I made for Christmas.  Contrary to its name, it was no accident - every component was planned out.  It was sweet, creamy delicious and massive.  I only have one glass bowl so I had to almost double it so it wouldn't look wimpy.

There are hundreds of trifle recipes out there and no doubt you have a favourite one.  If you're new to trifle-making, this is a good recipe to try out.  The basics are there - cake, custard, whipped cream and fruit.  Total yumminess in every bite.  You can use store-bought products or homemade, whichever you prefer.  Personalize it to your tastes and prepare to wow everyone.

Accidental Trifle

1 stale or fresh layer cake or pound cake
6 cups strawberries, raspberries, blueberries (or any combination thereof)
1/4 cup granulated sugar
1 recipe prepared cream filling (recipe below)
2 cups 35% whipping cream
2 tbsp granulated sugar
1/4 cup sherry (any kind), optional
1 cup raspberry or apricot jam

Cut the cake up into slices, as evenly as you can - they can be ragged or funny shaped: it doesn't matter.  Prepared fruit (wash, slice, peel do whatever must be done) and toss it with 1/4 cup of the sugar.  Prepare the cream filling and let cool.

Pour the whipping cream into a large bowl and add the remaining 2 tbsp of sugar.  Beat with an electric mixer on high speed until the cream is thick and holds a soft peak when you lift the beaters from the bowl.  Set aside.

Arrange about half of the cake slices in a layer on the bottom of your prettiest glass bowl (approximately 8-inch/20cm in diameter).  Sprinkle the cake slices with sherry, then spread with half of the jam.  Top with half of the fruit, then slather with half of the cream filling.  Cover with half of the whipped cream.

Now repeat: the rest of the cake slices, more sherry, the rest of the jam, the rest of the fruit, rest of the custard and the rest of the whipped cream.  Smooth the top of the whipped cream and decorate with a few extra berries.  Makes 8-10 servings.

Cream Filling

2 cups milk
3 eggs
2/3 cup granulated sugar
3 tbsp cornstarch
2 tbsp all-purpose flour
2 tbsp butter
1 tsp vanilla
1/2 cup whipping cream
1 tbsp granulated sugar

Blend together the milk, eggs, 1/3 cup sugar, cornstarch and flour.  Blend until smooth, then pour into a medium-sized heavy saucepan.  Cook, stirring almost constantly with a whisk, over medium-low heat until the mixture becomes smooth and thick - 5 to 8 minutes.  Do not leave this stuff alone for a second.  It will thicken suddenly and without warning.  Remove from heat and stir in the butter and vanilla, whisking until smooth.  Cover the surface of the hot custard with a layer of plastic wrap (to prevent a skin from forming), and refrigerate for an hour or two until completely cooled.

With an electric mixer, beat the whipping cream with the 1 tbsp of sugar until stiff.  Peel the plastic wrap off the custard and beat briefly with the mixer so it is smooth and creamy.  Gently fold in the whipping cream until fully incorporated.  Now its ready to use in your trifle.

Recipe Source:  The Clueless Baker, 2001

Notes:  I made my trifle without sherry and used strawberry jam.


Saturday, December 24, 2011

Gingerbread Men

Making your own gingerbread is rewarding and simple to do. It's most likely better than anything you could buy at your local coffee shop or grocery. You can bake to your desired doneness - softer for dunking but firm enough to hold whatever shape you make. Yummy!

Wishing everyone a safe and happy Holiday Season!

Gingerbread Men
1 egg
1/2 cup molasses
1 cup granulated sugar
1/2 cup solid vegetable shortening, melted
1 1/2 tsp baking soda
2 1/2 cups all-purpose flour
1 tsp cinnamon
1/4 tsp ground ginger

In a large bowl, mix together the egg, molasses, sugar, melted shortening and baking soda. Beat well.

In another bowl, stir together the flour, cinnamon and ginger. Add flour mixture to the egg mixture, blending well. Chill the dough for several hours or overnight.

When you're ready to bake, preheat oven to 350F. Lightly grease two cookie sheets, or line them with parchment.

Cut the dough into 4 pieces. Form each portion into a nice compact ball, flouring it well. Roll out each piece on a well-floured surface to about 1/8-inch (3mm) thickness.

Using cookie cutters, cut out gingerbread people (or animals, or dumptrucks etc.). Carefully transfer people to the cookie sheets and bake for 5 to 7 minutes - until very lightly browned around the edges. Watch them closely - small shapes will bake more quickly than large ones.

Let your cookies cool for a minute or two before removing them to a rack to cool completely. Decorate with icing. Let icing set before eating (if you can wait).

Icing Paint
4 cups icing sugar
1/3 cup water
paste food colouring

In bowl, whisk sugar with water, adding up to 2 tbsp more water if necessary to make spreadable. Tint with food coluring as desired.


Recipe Sources: The Clueless Baker, 2001 & Canadianliving.com
Posted by Picasa

Monday, December 19, 2011

Mini Panettone Cookies

The Holiday Season is here and with it comes all the smells and flavours we associate with this time of the year.  I don't think you can go into a grocery store without seeing boxes of Panettone stacked like a mountain.  If you like this seasonal bread then you'll enjoy these cookies flavoured with fennel, almond and orange.

The cookies are very petite and the batter is thin-ish so when you make them try to put even amounts of the cherries, nuts and raisins in each so they end up being roughly the same size.

Mini Panettone Cookies

1/4 cup salted butter, softened
1/2 cup packed brown sugar
1 egg
1 tsp grated orange rind
1/2 tsp almond extract
1/2 tsp anise extract (or 1/2 tsp fennel seeds or anise seeds, crushed)
3/4 cup all-purpose flour
1/4 tsp baking soda, baking powder and salt
1/4 cup chopped candied red cherries
1/4 cup golden raisins
1/4 cup toasted pine nuts or toasted slivered almonds

Icing

1 cup icing sugar
2 tbsp salted butter, softened
4 tsp milk

In large bowl, beat butter, sugar and egg until fluffy; beat in orange rind, and almond and anise extracts.  In separate bowl, whisk flour, baking soda, baking powder and salt; stir into butter mixture.  Stir in cherries, raisins and nuts.

Drop by rounded 1 tsp about 2 inches apart, onto parchment paper-lined baking sheets.  Bake in 350F oven until golden, 8 to 10 minutes.  Transfer to racks, let cool.

Icing: In small bowl, beat icing sugar, butter and milk until smooth.  Using piping bag fitted with plain tip or resealable plastic bag with corner tip cut off, pipe icing decoratively over cookies. (Or spread with knife.)  Makes about 60 cookies.

Recipe Source: Canadian Living Holiday Celebrations, 2009

Monday, December 12, 2011

Whole Wheat Peanut Butter Cookies

Peanut butter cookies are one of my favourite cookies.  They're easy, fast and always taste delicious.  Add some chocolate chips and they become out of this world.

This recipe completely uses whole wheat flour.  Sometimes too much whole wheat can make baked goods heavy and loose its light texture.  In these cookies there is no fear of that - no one will know!  The texture is chewy and I baked mine a little longer so the edges were crispy and the centre soft.  If you want, the recipe can be made with all-purpose flour or a mixture of both.

Whole Wheat Peanut Butter Cookies

1/2 cup butter
1/2 cup peanut butter
1/2 cup granulated sugar
1/2 cup light brown sugar
1 egg
1 1/4 cup all-purpose or whole wheat flour
1/2 tsp baking powder
1/2 tsp baking soda

Preheat oven to 375F.

In large mixing bowl, using an electric mixer, beat together the butter, peanut butter, granulated and brown sugars and the egg until creamy ans thoroughly mixed.  Add the flour, baking powder, baking soda and blend  very well.

Now make the cookies: by hand, roll the dough into 1-inch (2 cm) balls, place them on an ungreased cookie sheet, leaving 2 inches (5 cm) between them to allow for spreading.  For the classic peanut butter cookie look, flatten each ball of dough with a fork, pressing lightly to make a criss-cross pattern.  Bake for 10 to 12 minutes, until cookies have puffed slightly and are lightly browned on the bottom.  Makes about 3 1/2 dozen.

Recipe Source: The Clueless Baker, 2001